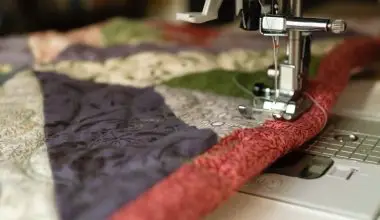
Before adding the binding, it is important to square the quilt top. This will make sure that everything is square. Double-checking this step will help you achieve a straight edge quilt and provide an even foundation for sewing. The binding should be sewn on the same side as the top. If you are using a double-sided binding, you will need to sew the two sides together.
You can use a seam ripper or a sewing machine to do this, or you can do it by hand. It is a good idea to make sure that your binding is not too tight or too loose, so that it does not interfere with the quilting process.
Table of Contents
Should I square up my quilt before adding borders?
Once your piece is quilted, you need to make the edges even and square before adding your binding. If the three layers are sewn together at the edge, it will be easier to trim the quilt sandwich. The bottom layer can shift and you end up with edges that are not square. Add the binding to the top and bottom layers. You can use any type of binding you like, but I like to use a thick, heavy-gauge, double-sided tape.
This is the kind that is used to hold a piece of paper together. If you don’t have a tape measure handy, just measure the width and length of the piece you want to bind and cut it to size. Then cut the tape to length and secure it in place with a rubber band or elastic band. The tape should be about 1/2 inch wide and 3/4 inch long.
Make sure that you have enough tape on each side to cover the entire bottom and top layers, and that it is long enough to wrap around the whole piece. I usually use about 2-3 inches of tape for each layer, depending on how thick I want my piece to be.
Which borders go on a quilt first?
The side borders are first added. Take the average of the two measurements and add them together to get the total length. For example, if you are measuring the width of a 24-inch square, you would measure 24 inches on both sides, then divide that number by 2 to find the number of inches you need to add to your total.
You can also use this method to determine how many inches to cut from the top edge of your fabric to the bottom edge. When you have your measurements, it’s time to start cutting. Start by cutting a piece of fabric that is the same size as the fabric you will be using to make the border. This will give you an idea of how long your border should be.
Next, cut two pieces that are the exact same length, but one of them is longer than the other. The longer piece should go on the outside edge, while the shorter piece will go in the middle. Cut the pieces as close together as you can, so that you end up with a rectangle that looks like this: Cut two more pieces, this time one longer and one shorter.
How wide should borders be on a quilt?
The size of the finished quilt should be taken into account. As a general rule of thumb, a small wall hanging should have a border of less than 6″ while a king-size quilt can handle a 12″ to 14″ border. The quilt center is diminished by the borders that are too wide. If your border is too large, you may need to cut it down to a smaller size.
You can do this by cutting the border in half and sewing the two halves together, or you can use a ruler to measure the width of your borders and cut them down accordingly. If you are working with a large border, it may be necessary to make a second border that is smaller than the first one. This is especially true if you want to use the same border for two different quilts.
How do you pick a border on a quilt?
When you have a quilt with more than one border, it is normal for it to go in a specific order, such as the inner border is a light colored fabric, then a medium fabric and then the outer border is darker.
If you’re not sure what to do with your quilting scraps, you can always use them to make something new. You can then use the scraps to create a new blanket with a different color or pattern.
Why are the edges of my quilt wavy?
You may be stretching the quilt itself or your binding fabric. Pulling on either of these can cause one to be slightly longer than the other and cause the fabric to stretch. If you are using a quilting machine, make sure that the machine is set to the correct tension. If it is not, you may need to adjust the tension on your machine.
What do you put in the middle of a quilt?
The middle of a quilt can be made from cotton, polyester or wool. sewing is the process of sewing together pieces of fabric to create a finished product. Sewing is usually done with a machine, but can also be done by hand.
You’ll need to know how to use a needle and thread, as well as a sewing machine. If you’ve never sewn before, it’s a good idea to get some basic sewing instruction from a friend or family member before you start sewing.
How do you fix a wavy border?
A “piano key” design is also very effective for handling wavy borders. Extra fabric can be slipped between the lines since the lines can be spacing any distance apart. You can also use this technique to create a border around the edges of quilts. This is especially useful if you have a lot of fabric to work with and want to keep it neat and tidy.
You can use a ruler to measure the width and length of your border and then cut it to size. If you are using a fabric that is not stretchy you will need to stretch it a bit to make it work. I have found that the best way to do this is to fold the fabric in half lengthwise and lay it flat on a flat surface.
Then, using your ruler, measure out the length and width of each half and cut them to your desired length. Repeat this process with the other half. Be careful not to cut too much fabric, as this will cause the borders to be too wide and will not work as well as you would like. Once all the pieces are cut, lay them out on your work surface and use your quilting needle to sew them together.