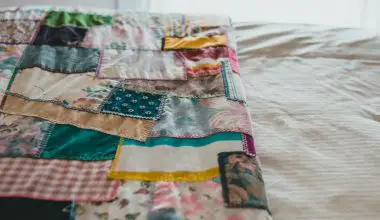
If you’re binding a quilt with curved edges, you’ll want to cut bias strips. Bias strips can be purchased at most fabric stores, or you can make your own by cutting strips of fabric that are about 1/4 inch wide and 3/8 inch long. Fold the strips in half lengthwise, and then fold the long side over the short side.
You’ll end up with a strip that looks like this: You can also use a ruler to measure the width of your bias strip, then cut it to the length you need. For example, if you have a 12-inch wide strip and need a 6-foot length, cut the strip to a length of 12 inches and cut another 6 inches off the end.
This will give you a total of 24 inches, which is what you will need to bind your quilting squares together.
Table of Contents
How do you make a double fold seam binding?
Press the allowances seam to one side when you open up the strips. Once you have one long strip of fabric, fold it in half and match the two long raw edges. The fold needs to be pressed. Now you’re ready to sew. I like to use a 1/4″ seam allowance on my sewing machine, but you can use whatever you like.
If you don’t have a machine that can do this, you’ll have to do it by hand. You’ll also want to make sure that the raw edge of your fabric is facing up, so that it doesn’t show through when you sew it together. It’s a good idea to put a piece of masking tape on the back of each seam to keep it from fraying.
Once you’ve sewn all the way through, it should look something like this. Now it’s time to attach the buttons to the shirt. Start by pinning the button holes in the front and back. Make sure to leave a little bit of extra fabric on each button hole to give it a more finished look. Then sew them in place with a seam ripper or a zig zag stitch.
How much binding do I need for a full size quilt?
The entire length of your binding should be the same as the perimeter of the quilt. If you are using a fabric that is not 100% polyester, you will need to add a small amount of water to your fabric to make sure that it does not shrink.
You can do this by soaking the fabric in hot water for a few minutes and then rinsing it in cold water. If you do not have access to a machine that can soak fabric for you, then you can use a cotton swab soaked in warm water and let it soak for about 10 minutes. This will help to prevent shrinkage.
How much fabric do I need for binding?
Divide the total perimeter by the usable width of the binding fabric, but for extra-wides it could be up to 104″; this is the number of strips you will need to cut. You can get the quantity of fabric by taking the number of strips and dividing them by 21. For example, if you want to make a pair of jeans, you will need a total of 4½ yards of denim.
Divide that number by two, and you get 4.5 yards. Multiply that by 1.25, which gives you 4 yards, so you have 4 ½ yards to work with. If you’re making a shirt, divide the shirt’s total width by 4, giving you 2.75 yards; multiply that amount by.75, to give you 1 yard; and so on, until you’ve got the right amount of material for your project.
What is the difference between single-fold and double fold binding?
Single-fold bias tape has two folds, while double-fold bias tape has three. Double-fold bias tape is generally used to bind an edge, and is visible from the outside of a garment, while single-fold bias tape is used as a narrow facing, which is invisible to the naked eye.
How to use it The easiest way to apply bias-tape to your garment is to lay it flat on a flat surface, such as the floor or a table. Fold the tape in half lengthwise, then fold it in the opposite direction, so that the two ends are facing each other. This is called a “fold-and-stitch” method.
You can also use a sewing machine to do this, but it’s a bit more time-consuming. If you’re using a machine, you’ll want to make sure that your machine is set to “single fold” or “double fold,” and that you have the correct needle size for the size of your fabric. For example, if you are using an 8-by-10-inch (or larger) fabric, your needle should be a 3/8-in.
Do I quilt or bind first?
The final stitching will be done by machine if you start on the back and wrap to the front. I will walk you through the steps. Cut a piece of fabric that is about 1/2″ longer than you want your binding to be. This will give you enough room to wrap around the edge of your fabric.
I cut mine at about 3/4″, but you can cut it any length you’d like. You’ll also want to make sure that the fabric you’re using is long enough so that you have room for your quilting needle and thread.
If you don’t have enough fabric to cover the entire binding, cut another piece that’s about the same length as the first piece and wrap the two together to create a larger binding. (You can also make a smaller binding by cutting two smaller pieces and then wrapping them together.) Using a sewing machine, sew the top and bottom pieces together.
Fold the bottom piece in half and pin it in place.
How do you sew straight edge binding?
Put the end of one strip on top of the other, so that they are 90 degrees from one another. If you want to sew all the way around the strip, you need to trim the corner and sew a diagonal line at a 45 degree angle. Cut out the strips. You can use a serger to cut out your strips, or you can do it by hand.
If you’re going to serge, you’ll want to make sure that the edges of your serged strips are as straight as possible, so that you don’t end up with a strip that looks like the one in the picture above. I used a straight-edge ruler to measure the length of my strips and cut them out, but you could just as easily use an exacto knife to do the same thing.
Once you’ve cut your strip, it’s time to sew it together. Start by sewing the two ends of each strip together, using a 1/4-inch seam allowance. Make sure to leave a little bit of extra space at the top and bottom to allow for the seam allowances to sit flush with each other. Then sew the ends together again, making sure not to overstitch.
How much do you trim a quilt before binding?
Most people will tell you to trim your quilt exactly on the edge of the quilt top, but if I can, I like to scoot my ruler out about 1/16″ to 1/8″ outside the edge of the quilt top. This gives me a small amount of bulk that I can use to fill up the binding.
If you want to make your own binding, you’ll need to cut out a piece of fabric that’s about the same size as your top and cut it out. Once you’ve cut your fabric out, fold it in half lengthwise and pin it to the bottom of your binding. Then, using your sewing machine, sew the two pieces together.
If you have a machine that has a zig-zag stitch, it’s a good idea to use that instead of a straight stitch because it will give you a little bit more room to work with. I used my machine to sew my binding together, and then I sewed the edges together with a seam ripper to give it a nice, clean finish.